Wednesday, November 28, 2012

In the Works Wednesday

So I like the idea of a at least once per month "In the Works Wednesday" column. There's always stuff going on over here, it's just a matter of taking the time to blog it. The latest stuff as I bet you've gathered is the ceramic side of things. Molds, bisques, and now...glazing! It's been something I've wanted to do for a while now. Getting to this point has been a culmination of all my cold painting and molding skills combined. 

Since the type of glazing I'm doing is overglazing, it is very similar to cold painting. There are a few differences, but they are minor and I've adjusted techniques I used while oil painting to work with the slickness of the china. There have been some other challenges to pop up - like reds. 


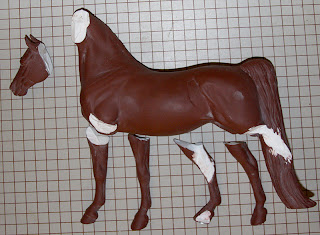
Red glazes don't like you. You glaze a fantastic red horse, put it in the kiln, and take your horse out to see that the color has disappeared/fired off in the process. It took about 5 fires to find out what worked best. While browns that had a warm cast would give you a slightly reddish tone, I wanted fire-engine red abilities. I found it in a product called Rose Glow Additive by Jean Nordquist. It stabilized my reds enough so that I could fire them and not have them fire out. You can make out the red tones in the horse above. 

Another challenge is not so much with the glazing, but with photographing. The horse above looks glossy, but she's not. Even the matte horse below looks shiny. The glazing just seems to reflect every little bit of light, which makes photography a nightmare. I will be dusting off my photo cube shortly. And, because I am doing many layers of transparent glazes, the colors are wonderfully deep and change depending on which way you look at her. It's a really nice realistic quality...that does not photograph. By the photo of the Darcy above, you'd never guess the amount of color and layering in that dark topline/forehand area. It just shows as one big mass of dark. I also see lots of unusual angles in photos of these guys to try to capture that changeability. 


This Darcy was meant to be a buttermilk buckskin, but she just kept telling me she wanted to be a dun. So, I've caved and given in to her wishes. I'm debating leaving her this chestnut dun, or making her a bay dun with the black legs and m/t. I'd love to hear thoughts from people as she'll be up for sale when finished. 


Wednesday, October 24, 2012

In the Works Wednesday

Silly title, I know. It's late. I decided not to post the new photos of the finished painted works because I'm *so* close to uploading the new website that I'll save them for there. The blog is more for the "in the works" stuff anyway. All those "in between" pictures of the piece before completion need a place too. This is it. So, in the spirit of that, here's some shots of some little misc. sculpture stuff I've been up to!


Remember those three sneak peek photos a few posts back? That's the Icelandic Horse hangin' in his second coating of rubber. All that good stuff is dripping down onto the Willy Remember Me portrait piece, who's in her first layer of rubber. Still lots of layers to go. I've been neglecting them too. The poor Icelandic, Baldur has been sitting in that first layer for over a month now. Mimi has been sitting there too, just sans rubber. It only takes me a half an hour or so to measure, mix, and apply the rubber to the two of them so I need to just set aside some time for them. 

I've also been experimenting with claybodying. For some time I've seen Darcy as an Arab, but never wanted to do all that customizing work in resin and Apoxie. Mud ponies provided the answer. :) 


I love it! Don't mind that back right foot. It's globby and will be sanded after she's bisque. I'm thinking fiery chestnut with chrome. Or a contrasty dappled rose gray. Not sure which way to go yet. The original Darcy bisqued is below so you can compare. 


Tuesday, October 9, 2012

Success!

We did not get "burned" in this fire and two lovely bisque Darcy's are the end result! Check out the photo of Darcy 1 and Darcy 2 (claybody custom) Karen e-mailed me this morning!


What a nice way to start your morning, huh? I had gone up to Karen's yesterday for a quick lesson in how to work the kiln and programs. She wanted to see the real horses so she was nice enough to drive them down today for me. Aren't they gorgeous? I couldn't be more pleased. For all her amazing help and support I gave the claybody custom to Karen as a thank you. I cannot wait to see her work her glazing magic on it!

The earthenware slip I used was Laguna's CN-401G and I was worried it was going to fire an off white/tan color. Turns out it is a nice white after all! Good to know as this stuff is very easy to obtain and comes in these great little 1 gallon containers. It's been very easy to work with, which is a big bonus for a newb at all this. 

The uber thick cable for my crazy huge wattage-sucking kiln came in, so I'll be juicing this bad boy up shortly. Now that I know what I'm doing has been successful, there will be many more clinky goodies to come!

Sunday, September 30, 2012

Before the Fire

So you all remember the previous post where I showed off my new-to-me-kiln and the beginnings of Darcy's mold? Well, the mold has been finished and is a success!! I have two casts out of it and will be aiming for a third this week.

The casts have to dry out completely before being fired. Here is the first "bone dry" Darcy. All the casts are hollow, but at this point they feel deceptively hard. They aren't. I was sanding the bottom of her hooves to make sure she was perfectly level and that back right one popped right on off. I'm hoping it fires okay!


And this is a claybody custom in the "leather hard" stage. She's had all her pieces put together and has been out of the mold in my wet box for a few days. This is the point where I can really work with her and not worry about denting or deforming her. She's firm, but very easy to whittle away on. Notice the dark color of her vs. the above bone dry shots of the other mare. This is how much moisture content is in the slip! I'm not quite finished with the cleaning on this piece, but just about. 


I have to tell you just how much FUN it is to customize the clay! It's so completely different, and yet the same. You really have to have a soft touch, but once you get the feel for the medium it's amazing! Wrinkles are a breeze and come out SO nice! 


I'm really curious to see how this earthenware slip I bought fires. I had planned on buying the same stuff Karen G. uses but after months of waiting and bugging them, the supplier still hadn't made any so I had to look elsewhere. I've got a suspicion that this slip won't fire as "white" as the one I wanted. That's not a big deal for the initial few as it means they just won't have white markings as the white in china is made from wiping off the glaze to expose the bisque underneath. 

I've got a "fire day" with Karen on the 8th as the wonderful woman that she is is going to walk me through the firing process since this will be my first time (EVER) firing a kiln. First time molding and first time slip casting were successes so I'm hoping for a trifecta! Wish me luck. :)

Sunday, September 2, 2012

A peek at what's around the bend

I'm someone who can't keep their hands still. I can't watch a movie with my husband without having something to work on. Unfortunately, I can't paint and watch the tube, as my painting requires one long focused session. Sculpting is another matter. Its great to fill those tiny 5-10 minute spaces. Below are pictures of three pieces that are very near completion. 


This includes an Icelandic Horse stallion. 


An Irish Draught mare - who is with Jennifer Buxton for prepping. Photo is shamelessly pilfered without permission from Jennifer's blog as I never took in progress photos like I usually do. 


The third is of a foundation-type Morgan mare. Her legs need thinning and her face needs refinement, but Laura Behning is helping me out with making this gal look perfect since she'll ultimately be a portrait model of her mare Willy Remember Me.

Next post should be of a round of completed finishwork horses!

Sunday, July 29, 2012

I've gone and done it.

Done what? Well, gone over to the dark side of clinky ponies. Blame Karen Gerhardt. Or thank her. :)

Here's the thing with ceramics. You kind of need this rather important piece of equipment. Absolutely mandatory. A kiln. And for me, coming up with the expense of the kiln was the dam in my creative ceramic productivity. I knew I wanted a programmable one so I could let the thing go about it's business while I went about other business. I was wanting a small, but-still-large-enough-for-my-biggest-sculpture Skutt KM818 kiln, and have been searching for deals for the past year or so on Craigslist and other internet areas. Then, earlier this month I found the deal of the century. Seriously. I stole this thing. While it was much much larger than what I had planned on purchasing, we had the room and the price was too good to pass up. You really have no idea. 

So, one trip to Falcon, CO later and I am now the proud owner of this Skutt KM1227. The outside isn't all shiny sparkly new, but it's in working condition and the deal was good enough that I didn't care if it had some clay and glaze bits and bobs on the outer metal walls. One of the central elements needs replacing and a few of the bricks need replacing as well but that stuff is super easy. It's really remarkable how simply a kiln is built for the job it does. Repair on these guys is easy. 


My new (to me) Skutt KM1227 in it's place of honor in the front corner of our garage.
Obviously the crap around it will get moved during fires. :)


Here's a little size comparison - 
I'm 5'6" and as you can see the thing could easily fit me inside it!

So what am I doing with this Mama Jama kiln? I'm happy to share. :) For a while, it's been a dream of mine to see my sculptures cast in ceramic. Especially after Karen let another hobbyist and I play with her Boreas molds a couple of years ago. With the experience I've gained from resin casting and the knowledge I've been gaining on ceramic molding, I knew I could create my own plaster molds. 

Since Darcy was the first piece I produced myself in resin, I thought it fitting she be the first I produce in ceramic. She is ideal for the project as she is pretty simple as far as sculpture goes. She doesn't have some huge whipping mane or flying tail, and her body doesn't have a lot of undercut areas. All that makes Darcy a great "getting started" horse. 

Molding for ceramic is much different than molding for resin casting. Instead of being able to use a flexible material like silicone rubber, you use plaster. This means no undercuts as, unlike rubber, the plaster cannot bend around them to demold. What does this mean for Darcy? Well, unfortunately for her, it means this...


Now, some of you with light constitutions may be horrified at what I've done. But, like you do in bronze casting, it's easiest to separate the sculpture and it's protruding limbs and just mold things individually. This way, I'll only be dealing with 2-5 piece molds rather than some monster with 20-something pieces. Karen G actually just posted a fantastic blog update for those of you who want to see the process of casting and assembling an earthenware piece. 

My first extremity to mold is Darcy's head. I figured it would be the most complicated mold of the sculpture so if I could handle it, I could handle the rest of the sculpture! The mold ended up being 5 pieces. This is because I left the ears on. On many of these molds, the ears are one of those items that would get dissected from the body. In her case, I was inspired by Karen's "Optime" mold, which has this little backplate type deal. 


The working head to decapitated Darcy.


The end result - Darcy's head's 5-piece mold cube.

Below are shots of the individual mold pieces. There's some primer that stuck to the plaster in areas if you were wondering what the red and dark gray areas were. I'm really happy with the result. No air bubbles thanks to my vacuum chamber I use for my resin molds, and everything locks nice and tightly into place the way it's supposed to. 


The bad news is that now I have to wait like a month for this thing to fully dry before I can even think of pouring in the slip and get a casting. And I've got to finish the rest of the molds for this one sculpture. I've got her right front leg done and the rest of the legs will be easy so I decided to work on the body mold. At this moment, I'm half way finished with it. 

Monday, April 9, 2012

Works in Progress

So, since my website at this point is horribly out dated and I don't see any time to get to it in the near future, I'll post some WIP horses here. I'll actually be giving the website a nice facelift when I do get to it, so there'll be that to look forward too as much as the new photos that will be on it! 

These guys were the two I took photos of today for their owner to get a progress report on. That's the only reason they get their own post. There are many others in studio in various stages of progression. This first guy up is an Eberl Adonis resin getting a red chestnut tobiano paint job. I don't know why, but I tend to do things one side at a time. This side as you can see is nearly complete. The other is still only base-coated. X^D Things left to do on this side will be to smooth the body color a bit more and maybe touch up with some dry-brushed oils to bring out shadows slightly more. The chest, neck, head already have that on. The white is not completely finished either, nor have I shaded those areas or done all the mapping yet. I tried a new mapping color and am very happy with the way it came out!


The second is SMB's little Oliver. He and Mom are getting painted like Exmoor ponies. I'm experimenting with glazes on this guy rather than going with my normal full on wet-on-wet shading for the overall body tone. I think it will work out well in his case because of the extensive pangare. His legs, eyes, and nose still need the black shading. He's going to be done before momma as she's still sitting in primer waiting for these two to get complete before she gets her new clothes.

Saturday, March 31, 2012

Out with the Old

I'm so happy to say that I've finished off the oldest horse in studio! A *big* achievement! The resin is Brigitte Eberl's Lorenz and he's been painted a medium to light dappled gray. This guy is jam packed with hairing detail that doesn't show in the photos. He's off to his owner Monday. Below is just a fraction of his photos but you can get the idea. :) Enjoy.


I leave for Washington D.C. Tuesday for the week. I have a chestnut Mini Pearl resin that was also just completed and I think I'll give her her own blog post too after I'm back in studio so the blog doesn't stay so outdated.

Sunday, January 8, 2012

More Pure Happiness

So I forgot to take a picture of the quilt getting sandwiched, but at least I can tell you what I used. See that spray can below? Good stuff. I'll lay out my top piece on a large flat area and then carefully put my batting on top of it. I'll peel back sections and spray this stuff before meshing back together. Repeat for your backing layer.

I don't like pinning. I think it tends to pull fabric around, and well...I'm just uncoordinated with the stupid little things. Plus it's much faster to spray than to try to put five hundred safety pins and all those holes in your fabric. Other nice thing about this stuff is that it lasts a while. I've had this can for years and years and it's not spraying a clumpy mess - still that nice clean (well not really, but you get what I'm trying to say) sticky mist.


So, the other thing that I do vastly different from the normal quilters, is that instead of starting in the middle of your quilt and working outward, I like to start at a corner. The reason for this is that I've found it much more efficient to quilt a little, readjust your fabric so that there are no creases in the sandwich, and quilt a little more, rinse, repeat. Every time I started in the middle, I got a crease in either the top fabric or the backing fabric, no matter how many times I tried to adjust. When you quilt, even in free motion where your machine's feeddogs are down, you're still pulling some of those layers more than others. There is ultimately going to be adjusting...or creases which look awful unless you have a long arm machine or know a secret I don't (which is very possible).

Here's a picture of the machine during free-motion quilting. You can't see them as they're under the quilt sandwich, but the feeddogs are lowered so there is nothing directing the fabric but my hands. I wanted a fun tighter pattern to kind of punch down the neutral fabrics so that the blue bows stood out just a bit more. So I'm doing an echo shell pattern on everything except the blue fabric and borders.


The top has a really pretty variegated thread in brown tones, though I'm keeping things neutral on the back. You can see the quilting pattern more clearly in the photo of the back below. 


*Lots* more quilting left to go!