Done what? Well, gone over to the dark side of clinky ponies. Blame
Karen Gerhardt. Or thank her. :)
Here's the thing with ceramics. You kind of need this rather important piece of equipment. Absolutely mandatory. A kiln. And for me, coming up with the expense of the kiln was the dam in my creative ceramic productivity. I knew I wanted a programmable one so I could let the thing go about it's business while I went about other business. I was wanting a small, but-still-large-enough-for-my-biggest-sculpture Skutt KM818 kiln, and have been searching for deals for the past year or so on Craigslist and other internet areas. Then, earlier this month I found the deal of the century. Seriously. I stole this thing. While it was much much larger than what I had planned on purchasing, we had the room and the price was too good to pass up. You really have no idea.
So, one trip to Falcon, CO later and I am now the proud owner of this Skutt KM1227. The outside isn't all shiny sparkly new, but it's in working condition and the deal was good enough that I didn't care if it had some clay and glaze bits and bobs on the outer metal walls. One of the central elements needs replacing and a few of the bricks need replacing as well but that stuff is super easy. It's really remarkable how simply a kiln is built for the job it does. Repair on these guys is easy.
My new (to me) Skutt KM1227 in it's place of honor in the front corner of our garage.
Obviously the crap around it will get moved during fires. :)
Here's a little size comparison -
I'm 5'6" and as you can see the thing could easily fit me inside it!
So what am I doing with this Mama Jama kiln? I'm happy to share. :) For a while, it's been a dream of mine to see my sculptures cast in ceramic. Especially after Karen let another hobbyist and I
play with her Boreas molds a couple of years ago. With the experience I've gained from resin casting and the knowledge I've been gaining on ceramic molding, I knew I could create my own plaster molds.
Since Darcy was the first piece I produced myself in resin, I thought it fitting she be the first I produce in ceramic. She is ideal for the project as she is pretty simple as far as sculpture goes. She doesn't have some huge whipping mane or flying tail, and her body doesn't have a lot of undercut areas. All that makes Darcy a great "getting started" horse.
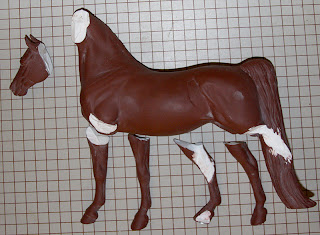
Molding for ceramic is much different than molding for resin casting. Instead of being able to use a flexible material like silicone rubber, you use plaster. This means no undercuts as, unlike rubber, the plaster cannot bend around them to demold. What does this mean for Darcy? Well, unfortunately for her, it means this...
Now, some of you with light constitutions may be horrified at what I've done. But, like you do in bronze casting, it's easiest to separate the sculpture and it's protruding limbs and just mold things individually. This way, I'll only be dealing with 2-5 piece molds rather than some monster with 20-something pieces. Karen G actually just posted a fantastic
blog update for those of you who want to see the process of casting and assembling an earthenware piece.
My first extremity to mold is Darcy's head. I figured it would be the most complicated mold of the sculpture so if I could handle it, I could handle the rest of the sculpture! The mold ended up being 5 pieces. This is because I left the ears on. On many of these molds, the ears are one of those items that would get dissected from the body. In her case, I was inspired by Karen's "Optime" mold, which has this little backplate type deal.
The working head to decapitated Darcy.
The end result - Darcy's head's 5-piece mold cube.
Below are shots of the individual mold pieces. There's some primer that stuck to the plaster in areas if you were wondering what the red and dark gray areas were. I'm really happy with the result. No air bubbles thanks to my vacuum chamber I use for my resin molds, and everything locks nice and tightly into place the way it's supposed to.
The bad news is that now I have to wait like a month for this thing to fully dry before I can even think of pouring in the slip and get a casting. And I've got to finish the rest of the molds for this one sculpture. I've got her right front leg done and the rest of the legs will be easy so I decided to work on the body mold. At this moment, I'm half way finished with it.


