Showing posts with label in progress. Show all posts

Wednesday, May 1, 2013

In the Works Wednesday

It's late, the light is bad, and I'm squinting because of it. It's a good place to stop before I can't see to go upstairs to bed! 

I've gotten my highlight/body color on a new face: Amelia's Eberl "Rose" as well as the first layer of dry-brushed shadow. This horse's reference is this amazing dark bay with these bright dapples. The lower shoulder/elbow area got a little sampling of it tonight, but I was starting to pull off that first dry-brushed layer. It's kind of a fluke that it wasn't dry enough to rub on it. Usually those thin layers dry pretty quickly. I'm thinking it's because I added some linseed oil to smooth the edges out more for a better blending zone. Something I'll have to keep in mind for next time. The much softer edges are well worth extra drying time though! 

Rose is one of those pieces that really changes when you put paint on her. This sculpture is extremely nice, but doesn't really come across that way being unpainted. I was shocked at how much I fell in love with her when she started to get her color! I'm excited to show you all how nice a "simple-colored horse" can look!


And, some more work done on JerryLynn's Sencillo. While the crappy lighting doesn't do anything for him, the main reason I posted this photo is the sections of different progress. From his head to his withers/elbow, his oil layers are finished. His tummy area shows the initial shadow layer. Lastly, that rump shows where I started with the highlight and body color oil base. You can see that the burnt umber adds a nice blanket of warmth to him. The raw umber gives him that "soot" look my customer wanted. 


JerryLynn also wants him graying and battle-scared on top of the overo markings. I found some great photos of old horses (mid 30's) that showed their gray gene only just starting to kick in. There was a high concentration of graying around the face, in the flanks, behind the elbows...the usual places that go first. I've laid down some white hairs in oil in the front section that has the final raw umber rub. That area will get lots more hairs added individually in pencil. Then comes the overo markings, and then those scars. Then I get to happily hand him off to his patient owner!

One last thing to share about Sencillo. While glazing a ceramic Darcy in linseed oil, I started trying the removal of color to reveal the dapples instead of just "outlining" them in dark tones. While it failed miserably on china (though a swap in mediums solved those issues), the same technique is fantastic on resin/cold-painting. I find it gives me a great irregular dapple, and by using a somewhat worse-for-wear brush I get this amazing soft hair look. It doesn't show in the photo near as well as in person (possibly because it's wet and very glarey) but the effect is much more realistic than the technique I was using before. I'll try to get a good closeup when he's finished so you can see what I'm talking about.

Now I hear my bed calling...

Sunday, April 28, 2013

Still Workin' Sunday

There is a live show coming up at the end of May. Live shows are probably the best motivation for me to finish horses. There's just something about the excitement of it that pushes me to work harder and do more. The real job has been hectic lately, but I've been putting in really late nights for the models to get things done. It leaves me pretty tired, but very satisfied! 

I've got about 9 or so horses I want to finish. They're all in various stages of completion, but the majority are pretty close to done. It seems to be how I work. There's usually not one horse finished, wait another month another horse finished, etc. It always seem to work out that I finish a small army of horses at once. And when I do, it's FANTASTIC! I can almost hear the hallelujah chorus now. 

These two just got oil layers on recently so they're the stars of the show for today. The first is a Sencillo resin. This will be the second that I've painted. I sold off half my very limited amount of personal copies which I had originally planned on painting, leaving me with two left. One will be used to mold the ceramic edition, the other will be for my personal painted collection - which consists of like three half-painted horses. X^D. Anyway, I don't plan on taking any more Sencillo commissions, so the two gals besides myself that have these painted-by-me Sencillo's will have pretty rare items on their hands. 

The owner of this guy requested a old graying sooty buckskin overo. He's pictured below with his light and medium tones finished, and he's now at the point where I can drybrush on some shadow and soot. The photo was taken at night with my iPhone and while the color is close, he's slightly more gold in person. The soot and shadow will make a big difference. When the body color is the way I want it, I'll start penciling in those old gray hairs. I found a fantastic reference photo for this! Then I'll add the overo markings to take him over the top. 


This next piece is Roundapony. You've probably seen this pony before on Jennifer Buxton's blog. I really enjoyed reading her progress on this piece as she took him from a really rough master cast to a fantastic customized "pony". Jennifer has a bit of a thing for ponies. ^_^. So when she got her hands on a master cast of Karen Gerhardt's Roundabout resin, she knew where she wanted to take him. Jennifer is also a trading model horse goddess. She's fantastic about trading services with, and since I hate prepping so much lots of my rough guys end up over there. In exchange I get to pick a model from her amazing nekkid collection to paint. When Roundapony was one of those options, how could I *not* pick him?? Sorry Tiffany Purdy, but I get this one!


He's shown in his first layer of oils too. He's got a long way to go before he's just right, but he's making a good start. And I'm happy to say that he's being a good little pony and is probably one of two horses out the many in my studio that is not giving me fits getting him painted. 


I love the fact that this guy is hunter clipped! I've not painted anything like that before and it's just a fun little change. Again, still a long way to go to get that body smooth and glowing in both the clipped and non-clipped areas. You'll see what I mean when the finished photos go up later.


Isn't his face *adorable*?! He's just a cute little stinker and I'm really enjoying myself painting him. When the bay body is where I want it, Jennifer also wants some tobiano markings on him. It just dawned on me that pretty much all my commissions left over are pinto horses! You can definitely see what's en vogue in the hobby. 

Wednesday, April 24, 2013

In the Works Wednesday

This post runs almost too late at night to remain Wednesday for some of you readers, but I'll swing it in under the wire to get my post title! 

Given the complete lack of light, the photos are not my best. However they give a good idea of the changes made to this little gal. She's pretty much done at this point except for her chest/underbelly/groin area. Those areas shouldn't take too long to finish and then I'll make my mold to get my master copy. That's where the real work begins. 


Those ears really need thinning and refining for that particular Saddlebred look. I loved the flagged tail!


I also loved the roached mane/forelock. It allows me to leave that neck exposed. As much as I love to sculpt hair on a horse, when you have such a beautiful neck, sometimes it's hard on me to have to cover it up.


I also adore the action of this piece! The resin legs will be heated and tilted in more to show the almost perfectly in-line positioning of the weight-bearing legs. That back hock needs tucking in more too. I had a blast really watching how these guys moved to get the dynamic twisting of the joints correct.


Notice the difference in the head? Besides some ear shaping (remember, thinning will come later in more durable resin form), I completely repositioned and resculpted her eyes. I added a little more to the front lower cheeks, and also reshaped the top of the nose a little. It really helped to make her look more like the breed she is portraying. Those ears getting thinned will make a huge difference in finishing off that look.


It is always astounding to me to see just how much difference the smallest little touch of clay will make on a piece. A sixteenth of an inch can make or break the look you were going for. It never ceases to amaze me, no matter how many pieces I've worked on. 

Sunday, March 3, 2013

The Sum of all her Parts is a Whole


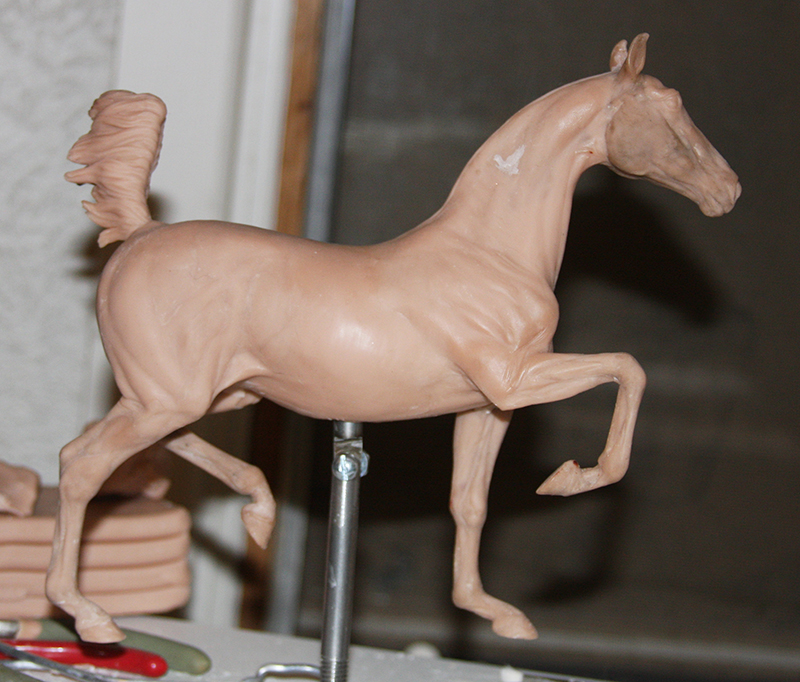
Here is our little science experiment from the last post. Notice she comes together quite nicely! Hopefully you can tell what breed she is now. :) She's looking *exactly* like my reference photo so I'm thrilled so far!


 The body comes together within a few hours usually. Mainly because I don't struggle with little intricate details as the body is a big mass with the exception of little wrinkles and rolls here and there. Getting those legs and head attached to the armature probably take the most time as that's where I do a lot of measuring. Once those things are on and secure, it's really hard to move them so it's best to make sure they're in the right spot to begin with. 


And while pushing those legs around they are easy to snap so you have to be gentle. You can see in this photo I managed to break off a little chunk of the weight-bearing leg while I was putting it on to the armature. Doh! It was repaired relatively well though I'll count on this being an area in the master resin to pay attention to and fix more. 


I *lurve* the way her neck came out!!!! Thin and long and delicate. The nice thing about this gal is she'll be getting a roached mane so I won't have to cover it all up! The real horse has neck "rolls" just like this gals, even though she's not cresty. She's still got her neck just about as far back as it can probably go and all that skin has to compact to do so, even on an ASB. The trick was to not go crazy with them, as I usually tend to want to do. 

The other side to this gal has not been touched. So, while this side looks good, the other is a horrible mess. Nothing smudging around clay doesn't fix! And I'll need a base for her. I just want a little something around the front weight-bearing leg. Debating on whether to attach that or make it detachable. Still thinking on it. And this young little filly has a name now too - Clementine. 

Tuesday, February 26, 2013

Pieces of Ponies

So, while the snow has been coming down I've been guiltily spending time sculpting. I needed a break from the painting just to freshen myself up a bit. After pouring another layer of rubber on Mimi and Baldur (Morgan mare and Icelandic Horse stallion), I decided to make a little more progress on a little filly I'm having lots of fun with!

I find myself wanting to do more "dynamic" poses lately along with the older mares. And I do like a challenge. I really like to take an element that I'm a little unsure of and really come to terms with it by incorporating it into sculpture. Darcy's element was the parked pose, Gawyn's was the drafty bulk and how to make all that hair peformance friendly, Baldur's is capturing the weight distribution and angles of a galloping turn, etc. Each piece had challenges, but those pieces had more readily described ones. This next piece incorporates leg angles in the movement as well as really dynamic shoulder action. Legs don't just move up and down, they move in and out too. It's hard to tell how much movement this pieces has until I put the legs onto a body, but I'm really happy with the results so far!


The leggies are pretty much as far along as they're going to get at this point. You'll see they're not all the way done near where they'd connect to the body. This is because I want to sculpt that part in - one for more stability of the sculpture, and two to create a smoother blend incorporating the "separate digit" from the piece. It'll look more seamless that way.


Thanks to Liesl Dalpe for the inspiration of sculpting the legs separate from the body! This method of sculpting really works so much easier for me. I can pick up the legs and work around all the angles without trying to cram in a long-handled sculpting tool into a tight squeeze. They are also much easier to measure lengths this way. 


While I like her young face, you'll notice I messed up and sculpted the eyes too far down the head. I've photoshopped two of the images to show where the eyes will end up. Now if only they were that easy to move in real life!


My favorite order of sculpting things seems to be start with the head (my absolute favorite part of a piece), then get the dirty work of the miserable legs out of the way next (I *hate* sculpting legs but I'm really making an effort to get better at them!), start the easy work of the body and assembling the entire piece as a whole, and then finish up with my second favorite part - hair. 

That's all the peek you get! For now. :)

Monday, January 14, 2013

Pizzaz Painting

Okay, so I'm a *huge* fan of Deb McDermott horses. I love that woman's work. And, her style of sculpting and my style of painting just seem to mesh really well. The end results are usually fantastic.

So naturally, when I got a chance to paint another David any way I wanted I was a very happy panda. He is probably my favorite sculpture by her to date. Here is a dark dappled palomino with some soot coming along. I love the way the overo markings just create even more movement in this piece and add just that much more "pizzaz." I'm usually not a huge fan of flashy paint jobs, but this guy has so much presence to him already, he can handle it without being overwhelmed.


This side is just about finished. The mapping needs to be added to that tummy spot, and more white needs to be applied to that leg. The m/t of course gets saved for last with the hoofies and base.


I adore this model's head. Honestly...just look at it! How could you not?


And those large eyes are great for painting. Can you believe this blue orb is done 99% in colored pencil?


Where's the other side? Not quite ready for photos. :) I need to add the layer of raw umber to bring out the soot and block in the markings on that side. Honestly, that's really all that's left to do besides finish the details.

I'm thinking I might have do grab an idea from Danielle Feldman's blog and do an artist collaboration post of pieces of Deborah's I've painted. There's not many, but the ones that have been done are definitely lookers!

Wednesday, October 24, 2012

In the Works Wednesday

Silly title, I know. It's late. I decided not to post the new photos of the finished painted works because I'm *so* close to uploading the new website that I'll save them for there. The blog is more for the "in the works" stuff anyway. All those "in between" pictures of the piece before completion need a place too. This is it. So, in the spirit of that, here's some shots of some little misc. sculpture stuff I've been up to!


Remember those three sneak peek photos a few posts back? That's the Icelandic Horse hangin' in his second coating of rubber. All that good stuff is dripping down onto the Willy Remember Me portrait piece, who's in her first layer of rubber. Still lots of layers to go. I've been neglecting them too. The poor Icelandic, Baldur has been sitting in that first layer for over a month now. Mimi has been sitting there too, just sans rubber. It only takes me a half an hour or so to measure, mix, and apply the rubber to the two of them so I need to just set aside some time for them. 

I've also been experimenting with claybodying. For some time I've seen Darcy as an Arab, but never wanted to do all that customizing work in resin and Apoxie. Mud ponies provided the answer. :) 


I love it! Don't mind that back right foot. It's globby and will be sanded after she's bisque. I'm thinking fiery chestnut with chrome. Or a contrasty dappled rose gray. Not sure which way to go yet. The original Darcy bisqued is below so you can compare. 


Sunday, September 2, 2012

A peek at what's around the bend

I'm someone who can't keep their hands still. I can't watch a movie with my husband without having something to work on. Unfortunately, I can't paint and watch the tube, as my painting requires one long focused session. Sculpting is another matter. Its great to fill those tiny 5-10 minute spaces. Below are pictures of three pieces that are very near completion. 


This includes an Icelandic Horse stallion. 


An Irish Draught mare - who is with Jennifer Buxton for prepping. Photo is shamelessly pilfered without permission from Jennifer's blog as I never took in progress photos like I usually do. 


The third is of a foundation-type Morgan mare. Her legs need thinning and her face needs refinement, but Laura Behning is helping me out with making this gal look perfect since she'll ultimately be a portrait model of her mare Willy Remember Me.

Next post should be of a round of completed finishwork horses!