Saturday, December 11, 2010

Llanura - Sencillo's mate


So, I've been plugging quietly away at this girl for probably around a year now. With the backlog, I haven't devoted much time to her, but she's finally had enough little work sessions on her to call her complete. I am *thrilled* with the way she came out!


Her name is Llanura (pronounced Ya new' ra - roll that rrrrrrr) and it means "plain". Sencillo means simple so we have "Plain and Simple" for our mustang pair. She's the epitome of a feral mare of spanish mustang decent. Bigger round bones, the spanish tail set/croup/hips, a chunkier head, short straight back, knotted/tangled mane/tail...the list goes on. Now, to make room for some of those babies she's probably had, her back is no longer so straight. Her hair is slightly windblown as she's standing in the same little breeze Sencillo is hunkering down in.


Her full array of photos can be seen on my yahoo groups mailing list in the albums section. If you're not a member and want to be, click here: http://groups.yahoo.com/group/AspenLeafStudios/join

Saturday, November 6, 2010

Dirt, Static, and Real Horses

It's been so dry and dusty here lately. No amount of brushing can remove the sheer amount of dirt on my two boys - trust me I've tried! It's really time for a bath, but it's been so cold lately there hasn't been opportunity. So, I've been exploring eco-friendly alternatives to pencil and paper on our 2 y/o 100% foundational bred Morgan gelding, Rocky...


He's such a sweetie he has no idea I'm having fun at his expense. He just registers that I'm touching and petting him. My other boy, 5 y/o Arabian gelding Myrlyn isn't as succesful as a dirtboard. He's very light and so the writing doesn't show up. Hubby and I have taken to writing new messages on hem every morning for our own amusement. We're so bad.

Myr has so much static cling from the dryness his tail is spreading out like one of those fiberoptic globe things. No pictures of that yet though.

Sunday, October 24, 2010

Sneak Peek of Morgan Stallion


Finally this guy is pretty much finished! I thought he was before, but then I took a break and came back. As usuall, all I have to do is refresh my eyes to see all those faults. And they sure do glare back at you!

For those of you who are unaware of this guy, his name is Fitzwilliam - Willy for short - and he's Darcy's main man. He's meant to be more of the old styel/foundational bred Morgan in type. I am very happy with how he looks now, but have sent out photos to a few experts to see where he stands. If he's good I hope to have the master cast in a few weeks, but we'll see. He's only going to be available unpainted to those of you who bought a Darcy or Elizabeth resin; otherwise, he'll be sold painted only.

Btw, ignore his feet. I'll be evening them out in resn as the clay is just not being friendly in that area.

Sunday, September 26, 2010

China day at Karen Gerhardt's!

 So I've been expressing an interest in china pieces for a while now. Let's face it. It's hard not to be sucked in by that glossy clinky goodness! Of course, one of our local residents here in CO is Karen Gerhardt, fantastic china painter/sculptor extraordinaire. :D Karen just got back from England where she spent a lot of time over at Alchemy learning about glazing and molding and all things earthenware related. She was gracious enough to host a "China Day" for Sheila Anderson Bishop and I!

Karen showed us her shelving, which holds all of her sculpture's plaster molds. Unlike resin molds, which are made from silicone rubber and are extremely flexible, bisque molds are made of plaster. The plaster of course is completely rigid, so there's so many more pieces that need to be made in order to wrap around the curves of the horse.

There are a couple ways to make the mold - one you can try to mold the whole horse as one big mold by creating a puzzle of mold pieces that fit together. I believe Stormwatch's mold was done this way and boasted of a count of 19 mold pieces!! Most resin molds consist of only two to three pieces, just to give you a better scope of things.

The second way is the more traditional way of doing it. You actually cut the body apart and mold the separate limbs, which once cast will be "glued" together before firing. Bronze is done this way too. I have to admit that when you read about this, this technique sounds scary as hell! But after our little clinic with Karen, it was completely un-frightening. 

So, Karen is a master clinician! Sheila and I get there to find Karen has laid out everything for us to begin. Our project for today would be a Mini Boreas. Now, this guy will end up being close to LB/Pebbles size after firing, but fresh out of the mold he's closer to classic size.

 Here's Karen with her lined up Boreas parts (one horse on one side of the table, a second mold for the same horse on the other side) along with Sheila:


 The biggest block there is the body mold. Then there was the mold for the head, four legs, and two ears.


Karen's pouring the "slip" into the plaster molds. The slip is literally just earth and water. Karen brought up a great point when she said she loved working with china more than resin because of the organic qualities of it all. There's none of the chemicals used in resin here. Just a wonderful natural earthiness. I loved it too!

Sheila and I learned that when your pour slip into the plaster molds, you want to pour down the side of the hole, not just down the middle so that no bubbles form and cause a wall to trap air. You want the slip to fill the cavity and the air to escape out of it in the process.

Now, some of you are probably asking, "Well how do you get it hollow then?" The thing we learned about slip casting is that once the slip has been poured into the mold, the plaster mold immediately begins absorbing the water out of the slip, causing it to harden. Apparently there is no set length of time for this process either. It's basically trial and error. You can get a small idea of where the slip's water level is by checking your pour hole clay to see if it's formed a skin or not. When you think you have a sufficient amount of slip that has thickened to form your sculpture's walls, you tip the plaster mold over and pour out the extra slip, creating the hollow middle since the dried slip will not pour out.


Karen and Sheila are shaking out the extra slip so we get the hollow cast. These molds are *heavy* so we tag teamed it by making the third person out the reliever. 

Now, something we *all* learned that day! One thing you want to make sure you do when pouring out the slip is to only slightly tilt your piece so that the slip pours out the side and still has room for air to come back in. Otherwise you'll create a vacuum that will suck the drier walls of the body in. You can see the evidence of this below.


We poured each mold twice so we had some spare body parts. Sheila took the body with the caved in flank and I took the body with the caved in butt. We also had some fun episodes with the head pieces so none of them were quite perfect. It was all for the sake of education though so not a bid deal. Plus they will be custom clay bodies so we were going to do work on them anyway.

I got so wrapped up in working on the piece I forgot to take more photos. Luckily Karen had hers out so I'm borrowing these photos (with permission) from her. In these next two, Sheila and I are "gluing" pieces on. To do this, we took the body and the piece we wanted to put on it and applied a quick brushed on bit of raw slip to the edges. Then you stick together and hold for a few seconds while the air dries the slip and the pieces bond. Then you go back and dab in more slip to fill in the gap of the seam. We'll clean these up later when the piece has dried out a bit more.


Sheila is gluing on her head while I'm working on my second back leg.  


Obviously we made Karen take the best parts so she could get a real cast. :D Here is her mini Boreas clay body custom!


Karen also thought ahead of the game and sent us home with our clay bodies in a humid Tupperware piece, a tub of slip, and orders to finish our products so we could fire them! I'm was giddy with anticipation when we left.  I've been working here and there on my piece in between things and I've now made the adjustments on how to work with the clay. My boy is definitely going to be a custom and I'm excited to show him to you all. When I get him closer to where I want him, I'll start posting sneak peeks here.

A BIG thank you to Karen for inviting us over for a fun day working with mud and ponies! :D I'm definitely a convert and will plan on doing more!

Saturday, August 21, 2010

Mini Blobness Gets Adjustments

So here's an update on our "Mini Blobness" series. We're looking at all the different stages and work that goes into creating a "Mini Darcy" from a small wire armature and Aves Apoxy Sculpt. I've been working on other projects - like getting out resins and painting commissions that I haven't done much work on her at all since our last update. However, I felt this part deserved a post to fill people in on how I'm "matching" Darcy.

It helps to have the big Darcy modeling in front of me while I sculpt on the mini, however even though I've already sculpted her once, seeing it again in a different scale is not as easy as one might think. I'm close, but I want exactness!

Photos of your piece can be an invaluable tool if you have a good camera that will not distort your item being photographed. One, you'll see the piece in a clear picture with a new eye. There's something about a different setting that recharges the eyes. I've heard people using mirrors for this too, but there's a reason I like photos better.

Superimposing!


By placing the picture of the original Darcy on top of the picture of Mini Darcy (or vice versa) and then turning down the transparency I can see exactly where I'm off. Close is no cigar! Lots of things were pointed out to me - the head and poll needed to be moved up, the front legs needed to be moved forward as well as shortened and the chest needed to be extended forward  a smidge, the back needs some slight straightening, though at least the length is correct, the tail extends to far out so it will need to be trimmed, the rear legs are too thick at the stifle and gaskin and need trimming as well, and the rear cannons' angle needs to be larger as well as the the length needing shortening. I learned *all that* just by putting the two photos together. Talk about a time saver!

So, the work begins! Here is where I miss my non-hardening J. Mac. clay/wax mix. You can't exactly squish and move cured Apoxy so, we slice into and break until I can bend the armature wires into submission! Her head no longer has enough support to hold it's weight in place so I'll need to be careful about getting the angle/placement right when I put Apoxy back around there.


Let the sanding and resculpting begin.

Tuesday, August 17, 2010

Domination of the Dapple Grays!

Yes! This August my studio is being dominated by all the dapple grays getting finished up and hopefully ready to go out the door by the end of the month. Another appropriate title would be "Death by Dapple Gray".


My poor white oil pencil keeps getting shorter and shorter. Pretty soon it will be just a little nub of a thing and I'll have to toss it. I hate tossing pencils. I will work with them until I cannot find a sharpener that will get the job done - usually leaving me drawing with a little 3/4" stub of a pencil, fingers protesting at working with such a small object.

Any artist will tell you that dapple grays are the hardest color to paint. They've definitely been my personal challenge for the last decade. However, something crazy happened while working on the Stormwatch. I had my airbrush base roughed on in there and was taking my white paint to try to tone some of the darkness down when my hands started to move of their own accord. Seriously. I remember thinking to myself, "That's odd..." while I watched them go. Within 30 min I had a section of blocked in dapples that looked fantastic. Now white painted on top of things tends to make a blue gray hue so I took some pigment and dry-brushed burnt umber and black into areas to warm it back up. Add another layer of finely painted white hairs on top of it, add cool contrasting flea-bites and bam! I had a dapple flea-bitten gray I could be proud of.


Of course I couldn't stop there. I got to thinking, "What if I did this?" and "What if I did that?" and had to grab the next commission order that had been neglected due to the complexity of it's color - a portrait gray on an Esperenza (the original) body. This order has been gnawing at me for a while, but I have learned from experience that when I struggle with a horse, just set it down and there will come a time when everything will fall oh-so-easily into place and the end result will be a million times better than if I were to have sat there and fought with it. Sure enough, this piece's time has finally come and I am moving on her! I feel I've matched the owner's mare perfectly! I've already painted over the other side of the piece and the areas already started to continue on with this new technique.


Here is the mare that she's a portrait of:

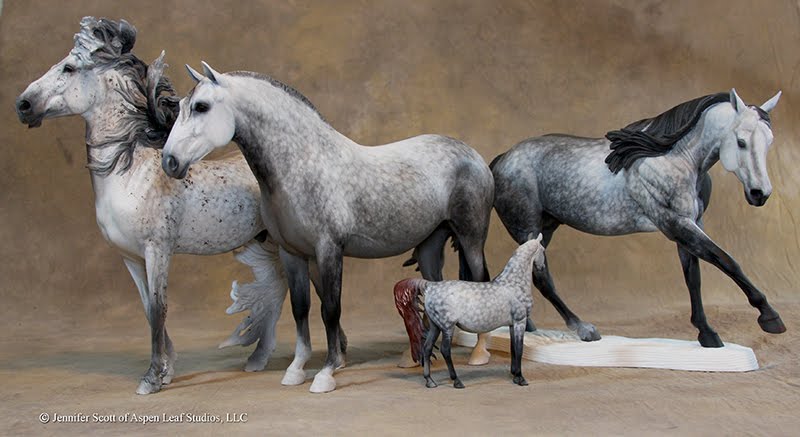
The last two pieces are sales pieces - the Rose Reiner and the Mini Ziryab. Mini Zyrab was another experimental piece and while I like the look of her, she's a different technique than the two above. I'm also working on a Rose Jezebel in dapple rose gray using the above technique and I'm finding out it doesn't lend itself as well to that small small scale. This is the reason I call them experimental pieces. I learn what works and what doesn't on what scale. I think I'll try a hybrid of the two techniques next time on a mini and see how it serves.

Mini Zyrab painted with wet on wet oils and then pencil detailing on top:

I'd like to see her dapples smaller and less uniform, but I'll continue onto her other side with the intent of matching this one. I'll know for next time to shrink them up.

And below is the Rose Reiner sales piece done in a more contrasty darker dapple gray with a lighter fore.


So I guess the story of this whole bit is that even if you have been painting forever, it's good to try new things out. The learning process is NEVER over and there is always room to achieve more. I for one am excited to start applying this technique over different base colors - I have a Gomez I am customizing for my own show string that I'll be painting dappled buckskin going gray. I'm eager to see if this technique will translate!

Wednesday, July 7, 2010

NAN lot peek and just because

I'm so squeaking under the deadline wire with this year's NAN donation, but she will be utterly worth it! When I first signed up I debated on going with either Legacy or Darling. But I was becoming particularly fond of my newer HUS filly so I decided to go with her. I also felt she'd be more versatile then my jumper and attract a larger crowd. If I had time, I probably would have sanded down her braids and banded her mane/forelock, but as you can see I ran out so I will just plan on doing that on another copy. I had also debated making "her" a "him" with some minor customizing, but again Time foiled me. That's the beauty of being the sculptor of a resin though is that many more bodies for all these ideas are readily available. :D LOTS of colors I want to paint on this gal as she can get away with anything under the sun with that stock breeding so she'll probably one of my most highly painted resins in the future.

Usually I only paint one or two of my editions. I want to change that. Now that I have a pretty good stock of unpainted resins of my own to choose from, I'll be integrating more paint work into my sculpting routine. In my on going quest to catch up from the disastrous roto-caster wait, I've been painting more while I get these unpainted bodies out to customers. I've found the switch a refreshing break and noticed that when I do go to sculpt, I feel more energized and my eyes more open to what I am doing. This is pretty important as it means I do things with less faults the first time so there's not to much "reworking" anymore. Do you know how much time that saves? And time is money when this is your "career".

But I digress. NAN Lot. My piece is part of the Sweepstakes lots and I'm pretty happy about that. My work sells for high dollars on the market, so this makes a very nice piece affordable to many people in that all it takes is one winning ticket! A small amount for a ticket is much easier than trying to come up with a huge sum of money.

The color I finally decided on for my "Girl Gone Hunting" was dunalino. It seams to be the emerging color lately and I knew it'd help show off the femininity of this piece. Not to mention I could get a "flashy" solid color done in time rather than trying for a more time-consuming pinto pattern. She's shown below in her airbrushed basecoat (forgive the messy studio table-top bg) and as you can see the soft golden color is lovely on her. She's as pretty as a girl could hope to be. :D And we'll add just a touch of chrome in those back legs and a small facial marking to top it off.

Moving away from the NAN lot for a moment, I felt moved to post this. Most of you know we moved from our Denver suburb home to the beauty of the CO foothills (which most of you would call mountains). Everyday I look outside or sit out on our deck and am so very thankful we could call this place home. It's been amazing. The majesty of nature that constantly surrounds me is breathtaking and so very refreshing and inspiring. I realized how stifled and frustrated I was becoming living in our cookie cutter home neighborhood now. I am so much happier and at peace up here. I grew up 1.2 miles away from our new home at the house my parents still live in too so it's basically coming home to me.

It's been really sunny here lately, as CO tends to be, but this last week we've gotten a little breather in the form of misty rainy weather. It's been wonderfully cool at about 60 during the day to break up all that mid 80's stuff. This is actually my favorite weather. Everything becomes so green and there is a magical feel to everything around me. We are usually quite literally in a cloud.

During the first day of this, as the rain storm was beginning to let up and move on, we were pleasantly surprised to see this double rainbow in our property. Hubby immediately told me to go run and grab the camera before they disappeared, as those elusive rainbows tend to do. This is our barn, though the horses are on the other side of the field when this was taken. You can't see it in this photo, but when the skies are clear, if you were to look where that ridge behind us goes down to the right there, the city can be seen. We call it our CO ocean because it almost looks like the rolling seas.

Monday, June 14, 2010

Flying Hearts Fundraiser - Melissa Gaulding needs our help!


It's truly amazing to me the capacity of generosity and love we humans can have. It just seems to take something very important for us to step up to the plate. And step up we have!

Melissa Gaulding, a fellow hobbyist known and loved by many of you, has had a run of nasty luck. Her husband Herman is battling cancer right now, and in order to pay for medical bills, she would liquidate her entire collection. Because of the effort of many individuals who wanted to share her pain and ease some of her burden during this tribulation, the Flying Hearts Fundraiser was born. Hobbyists across the globe have donated services or products to help raise funds, many offering up prize pieces in their collections. For someone who can have a rather cynical view of humanity like I can at times, it was truly an awe-inspiring and awakening sight for me to see the response of caring individuals. Of course, I had to get on board and do what I could to help as well!


So, my way to start off the donation line up was to paint a piece that had just been sitting base-coated in my studio for *years*. Enter Sarah Mink's Feral Mare medallion. She's up on Auction Barn right now! Be sure to check out all the other fantastic items hobbyists have donated as well in that special Flying Hearts Fundraiser auction section.

Next up? I'll also be painting a Dinky Duke graciously donated by Jackie Arns and will have a few other items. I have to make sure the rest are do-able before I commit them though. But if I can, they will be *very* nice items!

Thursday, June 3, 2010

More Mini Blobness and a Sneak Peek

Mini Darcy is shaping up, though she is most definitely still in the rough layout stage. Proportions are a bit off and so she'll need to be cut up and put back together in places. Things need to be sanded and other need building up. She really looks aweful right now, but again, this is for learning more about what goes in to sculpting a mini from scratch so they get posted anyway! They'll be fun to look back at after she's been beautified. ;)


Also, because I'm having such a good time with the mini and I'd like to get more out, I've got another little one I've started! The pose was taken from a photo of a Saddlebred and I was going to go that way, but I think I was channeling my Arabian at the time because this little thing just kind of went towards that breed on it's own accord. So, I'm not gonna fight it when it's yelling that loud at me!

Saturday, April 10, 2010

Blogging Again! New Mini blobness

Yeah! I am finally getting caught up enough in my resin production that I feel I can justify some time spent on the blog. As you can see from the date of my last post, it's been very neglected. Poor blog.

After about 2 and 1/2 weeks from now, I plan to be fully caught up on all my Darcy, Beth, Gawyn, and SG orders and will start on Legacy and Darling orders. Those should take me about 3 weeks to get caught up on as well. Darling is actually my NAN donation horse this year too. My creative juices have been overflowing and I have been near twitching to start new pieces. I have so many ideas lined up in my head it's starting to get crowded up there. ;)

I haven't had much extra time while I play catch up, but here and there when I could sneak in some sculpting time I've been working on a couple new pieces. These will be the first of the line-up to escape my head's captivity. I want to play with different scales so I can appeal to a wider market. So while one is still a traditional piece - the very much anticipated Morgan Stallion to complete the Darcy and Elizabeth set, the other is on the opposite end of the size scale - a 3" tall representation of Darcy! MINI Darcy! Now that the big gal is sold out, I felt it would be okay to start speaking of the shrunk down version. I thought it would be nice to give those who wanted a Darcy but couldn't afford her another option. Also, many people who only collected the smaller scale loved the big one, but again, wouldn't buy because she *was* traditional.

Mini Darcy is a completely new endeaver for me. The scale is very small, and at first I was a little intimidated. I also planned to use a wire armature with Apoxie Sculpt as my medium, instead of my normal J-Mac clay. The reason being I knew I would want to sand things down and get sharper curves, and I didn't think I'd be able to get that smooth look I wanted in complete clay form. So, a hardening material would be needed. I had a new order of Apoxie Sculpt sitting on my drafting table going "Pick me! Pick me!" so I did. :) I'm actually having quite a bit of fun with the medium. I don't plan on switching over to use it on my larger sculptures, but it's working out wonderfully on the smaller one! The technique is so different and the only thing I get a little frustrated with is the fact that I need to work in small layers and wait until that layer dries before adding a new piece. But, working with my oils has taught me much patience. :)

A lot of you are probably asking, "Well, why didn't you just have her digitally reduced like Mini Scarlett was and Bitty Bosco was?" The digital reduction process is *extremely* expensive (like around $2K). I've also heard that the master copy you get to work on has these lines running through the resin, which is extremely hard and difficult to sand down. Mane and tails are so bad as to almost be easier to resculpt. So, I thought it'd be more fun (and certainly easier on the wallet) to sculpt the complete piece from scratch and save myself all that not-fun work.

I thought it'd be a fun and interesting thing to see the process of her morphing into a blob on wires to somthing that resembled a horse. She still has lots of issues here that will be sanded down and redone, but again, these are the early stages and just shown as a explanatory peek into the process of sculpting a mini with Apoxy Sculpt, sand paper, and carbide scrapers. More to come. :)